SeaCat Tutorial - Chapter 2: Simple Post (iOS)
Foreword
This article continues with practical demonstration of strength and capabalities of SeaCat security framework in our tutorial series.
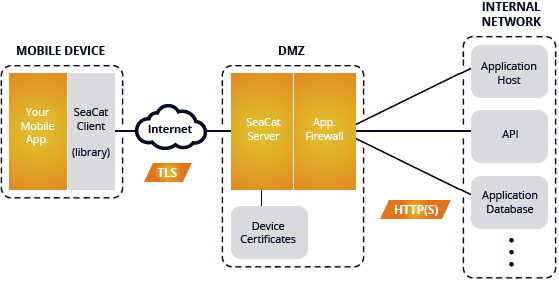
The goal of this article is to create a simple iOS client which generates a simple POST Request which will be read in host written in Node.js and the output generated in the console. The whole comunication will be handled by SeaCat which help us to establish fast and secure connection among our key components.
Requirements
To develop an application with using of SeaCat framework isn't difficult. Before you start you have to just make sure your development environment meets following criteria.
- Mac OSX compatible operation system.
- Xcode]
- Node.js
- SeaCat (trial pack)
Creating Node.js host
To prepare a Node.js host which is able to handle POST requests is a bit sofisticated (without external modules, like Express.js, in particular), but the code below helps you with coping with implementation and avoiding some of the pitfalls.
var http = require('http');
var querystring = require('querystring');

http.createServer(function (request, response) {
    // Check whether the method = 'POST'.
    if (request.method === 'POST')
    {
        // Variable postData is for storing incoming chunks of POST data.
        var postData = "";

        // Set UTF-8 encoding for request.
        request.setEncoding("utf-8");

        // Processing of POST chunks. Active method until all chunks have been collected.
        request.addListener('data', function(data){
            // Collect POST data.
            postData += data;
            // Limit the size of buffer -> 1e6 = 1 * 10 ^ 6 = ~ 1 MB.
            if (postData.length > 1e6)
            {
                // Kill the connection if too much of POST data.
                request.connection.destroy();
            }
        });

        // Once all POST data is collected, following method is triggered.
        request.addListener('end', function(){
            // Check if really received POST (based on the content type).
            if (request.headers['content-type'] === 'application/x-www-form-urlencoded')
            {
                // Prepare the header.
                response.writeHead(200, {'Content-Type': 'text/json'});
                // Read post data.
                var post = querystring.parse(postData);
                // Write the result to console.
                console.log(post);
                // End the request.
                response.end();
            }
        });
    }
    // Handle the request if method is something else than POST.
    else
    {
        // Write default header.
        response.writeHead(200, "Default request", {'Content-Type': 'text/plain'});
        // End of the Request.
        response.end();
    }
}).listen(1337);

console.log("Running the Node.js host");
This host implementation helps us to easily process incoming POST requests to http://localhost:1337/ and generate the output into command line.
Run the host by typing node filename.js in terminal (node NodeHostSimplePost.js in our case). If you are successful, you will see following output:

If you open another terminal and type in curl -X POST -d "name=yourname" http://localhost:1337 as shown in picture below:

You will get a similar response in the Node.js host console like below.

If you get similar output, your host is all set. Keep it running.
SeaCat Gateway configuration
Before we focus on iOS client development part, let's configure the SeaCat Gateway which will handle the secure comunication between the client (iOS) and host (Node.js).
Download SeaCat trial installation package and unpack the content of that package by typing tar xjvf SeaCat_Trial_OSX_iOS_14.12.tar.bz2 in working directory in terminal.

As the next step you have to modify the file seacat-trial.conf in SeaCat_Trial_OSX_iOS/SeaCatGateway directory. Change the default settings:
[host:test]
uri=http://127.0.0.1/
To the configuration represented by Node.js host settings (our host listens on port 1337).
[host:nodejshost]
uri=http://127.0.0.1:1337/
You can also download the updated version of seacat-trial.conf from GitHub.
Once your changes in seacat-trial.conf are saved, run the SeaCat Gateway by typing ./seacatd-trial in terminal window (the same working directory as seacat-trial.conf). If you see the output similar to following:

Your SeaCat Gateway is set correctly. Congratulations! Keep both Node.js host and SeaCat Gateway running.
iOS Client Application
Our iOS client will help us to add some interactivity to our communication. There will be a simple input field and a button which send that message towards our SeaCat Gateway.
Open Xcode and create a new iOS application. From the template list select Single View Application and click on the Next button.

A list of options will appear. Fill just Product Name and Class Prefix fields. For the purpose of our tutorial other fields are unrelated.

Once you click on the Next button and save the app, an empty project with Single View App Template will be ready.

Integration of SeaCat client
To enable SeaCat in our app and ensure the secure communication with the Gateway, we will need to incorporate the SeaCat client framework into our project structure.
Open SeaCat_Trial_OSX_iOS folder in Finder (at the place where unpacked SeaCat_Trial_OSX_iOS_14.12.tar.bz2) and drag SeaCatClientTrial.framework into Frameworks directory in Xcode.

Next screen asks you to either copy the whole framework into the project structure or just make a reference. Please make sure you have checked Copy Items option as shown below.

Once you click on the Finish button, you are all set. The SeaCat client part is successfuly incorporated.

To copy SeaCat client into the framework structures of our app is not enough. You have to also enable the functionality in the code. Select SimplePostAppDelegate.m file from Project Navigator.

And change the code from the default:
#import "SimplePostAppDelegate.h"

@implementation SimplePostAppDelegate

- (BOOL)application:(UIApplication *)application didFinishLaunchingWithOptions:(NSDictionary *)launchOptions
{
    // Override point for customization after application launch.
    return YES;
}
to one where SeaCat is incorporated:
#import "SimplePostAppDelegate.h"
#import <SeaCatClientTrial/SeaCat.h>

@implementation SimplePostAppDelegate

- (BOOL)application:(UIApplication *)application didFinishLaunchingWithOptions: (NSDictionary *)launchOptions
{
    /* This method finalises SeaCat client initial configuration. It also ensures that client is integrated with Core Foundation URL Loading System (check Apple URLLoadingSystem in documentation for more information). So all URL requests are intercepted, analysed and eventually processed by SeaCat gateway instead of common HTTP transport. */

    [SeaCatClient configure];

    return YES;
}
Your result will look similar like shown in the picture below.

Once you reach at this point, your app is ready for the last step - actual design which we cover in following section.
Designing an User Interface
Let's start with adding components to Simple Post View Controller in Main.storyboard.

From Object library select UITextField component and place it into the canvas like shown below.

Before adding other parts of the application, let's play a little bit with the Text Field settings. As the first step just change the size and make this Text Field wider.

The last thing in term of Text Field configuration is to change default settings of this component. Click on Text Field component you added few seconds ago and go to Attributes inspector section. Find Return Key object and change the value to Done. Also make sure the option Auto-enable Return Key is checked. This helps to disable the keyboard when there is no text.

Last component we are going to add is UIButton. From Object library select UIButton and place it on canvas like shown below.

To make the application better we will change the default settings of this component as well. Click on the button you just added and go to Attributes inspector section. Change the Title to Send and make sure the Enabled checkbox is unchecked.

Connection of User Interface with the code
We just completed the design of the app. Now it's time to make our app more interactive. Still in Main.storyboard section select Assistant Editor and within this pane make sure the file SimplePostViewController.h is opened.

Click on UITextField component on canvas, push Control button on your keyboard and drag the mouse cursor into interface section in SimplePostViewController.h in Assistant Editor.

In following popup window keep connection as Outlet and as a name write myTextField. Click on Connect button afterwards.

Click on UIButton component on canvas, push Control button on your keyboard and drag the mouse cursor into interface section in SimplePostViewController.h in Assistant Editor.

In following popup window keep connection as Outlet and as a name write mySendButton. Click on Connect button afterwards.

Keep UIButton component selected, push Control button on your keyboard again and drag the mouse cursor into interface section in SimplePostViewController.h in Assistant Editor (again).

In following popup window change connection to Outlet and as a name write sendAction. Click on Connect button afterwards.

After you are done with connections, the result will look like shown in picure below.

There is one thing you have to do before moving to next section. Connecting the delegate with the View Controller.
Click on UILabel component and select Connection Inspector menu as shown below.

The only thing you have to is click on empty circle in Outlets section, drag the mouse and move the cursor to Simple Post View Controller.

The result of this connection will look like this.

Let's focus on implementation of the actual logic.
Add some logic into generated code
In our last section we are going to complete our app by adding some logic. The first addition will be related to our UITextField. We had already implemented (by changing the properties in Attribute inspector) the mechanism which keep the button disabled until you type a character. That works fine until you delete what you wrote. The buttons stay enabled.
To fix that please add - (BOOL)textField:(UITextField *)theTextField shouldChangeCharactersInRange:(NSRange)range replacementString:(NSString *)string into SimplePostViewController.m
//SimplePostViewController.m

- (BOOL)textField:(UITextField *)theTextField shouldChangeCharactersInRange:(NSRange)range replacementString:(NSString *)string
{
    NSString *newText = [theTextField.text stringByReplacingCharactersInRange:range withString:string];

    self.mySendButton.enabled = ([newText length] > 0);

    return YES;
}
You also have to update - (void)viewWillAppear:(BOOL)animated method as following:
//SimplePostViewController.m

- (void)viewWillAppear:(BOOL)animated
{
    [super viewWillAppear:animated];

    [self.myTextField becomeFirstResponder];
}
Let's create a completely new method - (void)doPostRequest:(NSString *)stringMessage which help us to send a message written in text field to SeaCat Gateway.
//SimplePostViewController.m

- (void)doPostRequest:(NSString *)stringMessage
{
    NSString *bodyData = [stringMessage stringByAppendingString:@"=was sent by POST (and read in Node.js)"];

    NSMutableURLRequest *postRequest = [NSMutableURLRequest requestWithURL:[NSURL URLWithString:@"https://nodejshost.seacat/"]];

    [postRequest setValue:@"application/x-www-form-urlencoded" forHTTPHeaderField:@"Content-Type"];

    [postRequest setHTTPMethod:@"POST"];
    [postRequest setHTTPBody:[NSData dataWithBytes:[bodyData UTF8String] length:strlen([bodyData UTF8String])]];

    [NSURLConnection connectionWithRequest:postRequest delegate:self];
}
The last step is adding following to code to - (IBAction)sendAction:(id)sender method.
//SimplePostViewController.m

- (IBAction)sendAction:(id)sender
{
    [self doPostRequest:[self.myTextField text]];

    [self.myTextField resignFirstResponder];
}
The complete implementation looks like in picture below.

We are done
The moment of truth is here. We are ready to run the application in Simulator and check whether everything works as expected.
Click on Run button (and make sure the Simulator is selected).

Once the app is running, you can see that both buttons are disabled as there is no input in the text field.

Type anything into the text field and click on any of Send buttons.

You can see the output in console. Congratulations! and thank you for following our tutorial. Please visit also other blog entries from SeaCat Tutorial series.

All source codes from this example are available in GitHub.
SeaCat iOS tutorials in this series:
Most Recent Articles
You Might Be Interested in Reading These Articles

Entangled ways of product development in the area of cybersecurity #2 - BitSwan
After successfully completing my engineering degree, I finally started working full-time at TeskaLabs just as I initially promised. In addition to data from the world of telecommunications, we started to learn data from the world of logistics in BitSwan, which of course required being able to calculate the cost of transporting some cargo from point A to point B.
Published on December 15, 2022

Don't worry, ASAB and the universe can be fixed
How do my first sprints in TeskaLabs look like? Sheer desperation quickly turns into feelings of illumination and euphoria. And back. I've also made a few new friends and learned a thing or two about flushing metrics. The digital adventure begins.
Published on February 15, 2022

Software architect's point of view: Why use SeaCat
I've recently received an interesting question from one software architect: Why should he consider embedding SeaCat in his intended mobile application? This turned into a detailed discussion and I realised that not every benefit of SeaCat technology is apparent at first glance. Let me discuss the most common challenges of a software developer in the area of secure mobile communication and the way SeaCat helps to resolve them. The initial impulse for building SeaCat was actually out of frustration of repeating development challenges linked with implementation of secure mobile application communication. So let's talk about the most common challenges and how SeaCat address them.
Published on April 16, 2014
